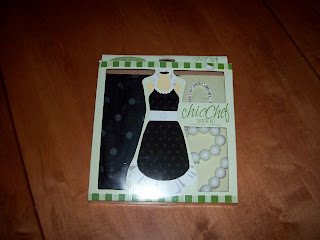
I got this kit on clearance at Hobby Lobby, and it looked super cute. It's for an apron, and I thought it would make a good gift. So yesterday, I decided to do it.
(This also coincides with the moment when I discovered Pandora Radio, which made the entire event much more pleasant.)
So I get the stuff out of the box.
It really is designed to be easy. They have all the pieces stamped on one piece of fabric, and I just needed to cut them out and put them together.
No prob!
Well, ok, slight prob. I really hate cutting. It makes me wish I could go back to kindergarten and take better notes, because I never seem to be awesome at it. This particular pattern was more difficult to cut out because large portions of it were white and the background was beige. And see, I'm kinda color blind, so that was pretty difficult. I mean, I can see most colors, but distinguishing between two colors that are very similar is really hard. (That's one of the reasons I like really bright colors.)
But, I did it, and it went ok.
The first thing I had to do was figure out how to sew the "flounce" on, which I finally decided was that ruffle on the bottom. Since it was supposed to be ruffly (flouncy?) it was actually longer than the bottom of the apron, so it took forever for me to pin it and re-pin it, until it matched. I finally got it sewn on, and I was ecstatic with the results.
Look at that, all sewn together and stuff! Awesome!
That was only the beginning of course, and I ended up having to get out my iron and ironing board, which I did not know was part of the bargain. And although I know the basics of how to work a sewing machine, I tried to push myself to new levels of awesome by doing things like, pivoting on the needle instead of starting over when I got to a corner. I also tried really hard to sew the entire length of one side without stopping and starting every five stitches, 'cause that's what I've seen them do in the videos about sweatshop workers, and I figure they probably know how to do it really well.
My biggest problem that I had was that they kept going back and forth in the directions between "1/4 seam allowance" and "3/8 seam allowance." Really, people? The difference between 1/4 and 3/8 is exactly 1/8 of an inch, which is like, a fuzz width. How does that make a difference? And I didn't
In the end, it turned out alright, so take that, varied seam allowance!
That ruffle at the top was kind of a pain. I don't really do gathering...
It came with a couple of cute accessories, although the beads did not have a loop on each end as pictured in the instructions, so I wasn't really sure how to attach them, and in the end, I just sewed them to the top of the apron. And they instructions had this part where I was supposed to gather the material horizontally in the middle and then put the pin on vertically, which made no sense to me, so I just put it on without gathering. Seemed logical. So here's the finished product:
Ta Da! Now I have a nice gift for someone, and I hope they don't read this blog.
By the way, the "two hour project" took me a little over four hours. Yeah. Unfortunately, it's not like I saved myself a lot of money by doing it myself, 'cause I'm pretty sure I could have gotten an apron for the price of the kit. But maybe once I get really awesome at sewing, I will be able to buy cheap fabric and turn it into cute stuff like this for much less than it would normally cost. That's the idea anyway.


Nicely done!!! Now I have an idea of where we need to start on sewing skills on Thursday ;-)
ReplyDeleteHaha uh oh, not sure if that's good or bad. :o)
ReplyDeleteExcellent job. For your next project, line up the fabric with the edge of the presser foot and it's one of the standard allowances, also check the metal plate under the presser foot and it should have little lines to line material up with for other allowances. :) Cute apron--definately awesome!!!!!
ReplyDelete